组件库开发
Created At :
Views 👀 :
目录改造及打包配置
使用vue-cli创建一个新工程
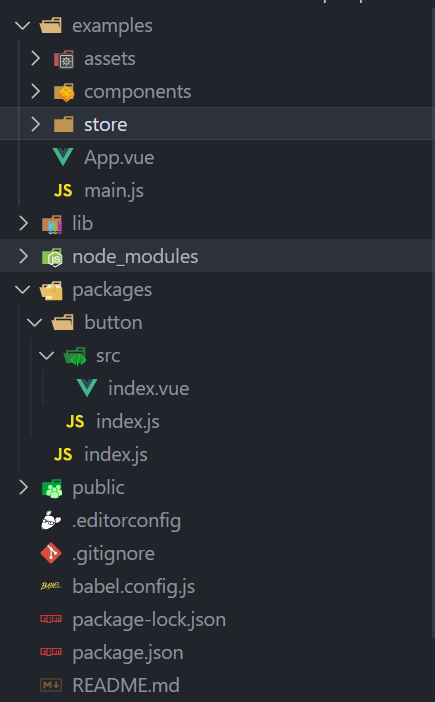
目录改造参考element
将src的目录文件改为examples,用来写组件相关文档和事例。
在根目录下新建一个 packages 文件夹,用来进行组件的编写。
在根目录下新建一个vue.config.js文件,修改入口文件地址为examples下的main.js,其次将packages加入打包编译任务中,配置如下
1
2
3
4
5
6
7
8
9
10
11
12
13
14
15
16
17
18
19
| module.exports = {
pages: {
index: {
entry: 'examples/main.js',
template: 'public/index.html',
filename: 'index.html'
}
},
// 扩展 webpack 配置,使 packages 加入编译
chainWebpack: config => {
config.module
.rule('js')
.include
.add('/packages')
.end()
.use('babel')
.loader('babel-loader')
}
}
|
编写组件代码
在packages目录下新建一个button目录
button/src/index.vue
1
2
3
4
5
6
7
8
9
10
11
12
13
14
15
16
17
18
19
20
21
22
23
24
25
26
27
28
29
| <!--
* @Author: feng
* @Date: 2022-11-09 15:03:34
* @LastEditTime: 2022-11-09 15:38:09
* @Description: file content
-->
<template>
<div class="x-button">
<slot></slot>
</div>
</template>
<script>
export default {
name: 'x-button',
props: {
type: String
}
}
</script>
<style scoped>
.x-button {
display: inline-block;
padding: 3px 6px;
background: red;
color: #fff;
}
</style>
|
button/index.js 单个组件的挂载
1
2
3
4
5
6
7
8
9
10
| // 导入组件,组件必须声明 name
import XButton from './src'
// 为组件提供 install 安装方法,供按需引入
XButton.install = function (Vue) {
Vue.component(XButton.name, XButton)
}
// 导出组件
export default XButton
|
packages/index.js 入口文件 导入所有组件并挂载
1
2
3
4
5
6
7
8
9
10
11
12
13
14
15
16
17
18
19
20
21
22
23
24
25
26
27
| // 导入button组件
import XButton from './button'
// 组件列表
const components = [
XButton
]
// 定义 install 方法,接收 Vue 作为参数。如果使用 use 注册插件,那么所有的组件都会被注册
const install = function (Vue) {
// 判断是否安装
if (install.installed) return
// 遍历注册全局组件
components.map(component => Vue.component(component.name, component))
}
// 判断是否是直接引入文件
if (typeof window !== 'undefined' && window.Vue) {
install(window.Vue)
}
export default {
// 导出的对象必须具有 install,才能被 Vue.use() 方法安装
install,
// 以下是具体的组件列表
XButton
}
|
测试组件
将组件导入到examples目录下的main.js中
1
2
3
4
5
6
7
8
9
10
11
12
13
14
15
| import Vue from 'vue'
import App from './App.vue'
// 导入组件库
import myui from '../packages'
// 注册组件库
Vue.use(myui)
Vue.config.productionTip = false
new Vue({
render: h => h(App)
}).$mount('#app')
|
这种方式是全局导入,至于按需导入,可以采用element的方式来配置
接下来我们就可以在项目中使用我们的组件了
配置package.json文件
1
2
3
4
5
6
| "scripts": {
"serve": "vue-cli-service serve",
"build": "vue-cli-service build",
"lib": "vue-cli-service build --target lib --name myui --dest lib packages/index.js",
"lint": "vue-cli-service --fixed lint"
},
|
lib脚本就是用来打包packages的组件代码到lib目录下,文件名为以–name指定的名称前缀开头
编写package文件的description,keywords等,具体介绍如下:
description 组件库的描述文本
keywords 组件库的关键词
license 许可协议
repository 组件库关联的git仓库地址
homepage 组件库展示的首页地址
main 组件库的主入口地址(在使用组件时引入的地址)
private 声明组件库的私有性,如果要发布到npm公网上,需删除该属性或者设置为false
publishConfig 用来设置npm发布的地址,这个配置作为团队内部的npm服务器来说非常关键,可以设置为私有的npm仓库
发布到npm
1
2
3
4
5
6
| // 登录
npm login
// 发布
npm publish
// 如果发布失败提示权限问题,请执行以下命令
npm publish --access public
|
之后mian.js就可以通过如下方式使用
1
2
3
4
5
| // 导入组件库
import myui from '../lib/myui.umd.min'
import '../lib/myui.css'
// 注册组件库
Vue.use(myui)
|
---